Installation Guide
It is glad to know that you want to set up the toolkit on your local workbench. Yet, it is currently not available in a simple executable package since the toolkit has not walked out from its alpha period. But do stay tuned, since I have created some automatic scripts to make your installation process easier. Also, we plan to have our first beta release soon! So make sure too smash the Watch and Star icons on the top right of the page!
0. Prerequisites
In this section, we will talk about the hardware, system, and software requirements
0.1 Hardware
| Component Name | Recommended Set-up | Minimum Requirement |
|---|---|---|
| CPU | Intel i-series/AMD Ryzen 4+ Cores | Intel i-series/AMD Ryzen 2 Cores |
| RAM | 2 GB or more | 256 MB |
| GPU | NVidia with CUDA | As long as you see stuff on screen |
| Pre-install Free Disk | 5 GB or more | 582 MB |
If your system does have NVidia graphic card, and would like to utilize the GPU hardware acceleration. Please visit CUDA Zone to obtain the latest package for yourself prior to the installation process.
0.2 System Environment
| System Type | Recommended | Minimum Requirement |
|---|---|---|
| Windows | Windows 10/Server 2016 R2 (64-bit) | Windows 7 (32-bit)/Server 2008 R2 (32-bit) |
| MacOS | 10.14+ | 10.8.3 |
| Debian/Ubuntu/Libux | 4.10 Generic Kernel+/18.04 LTS (64-bit) | 2.6.10 Generic/12.04 LTS (32-bit) |
Please try to update your system beyond anything released in 2010 to prevent dependency related issue. Plus, CUDA and OpenCV hit hard performance roadblock in elder system build.
More specifically, if you are on Server Edition system, particularly if you are on Server 2008, you should make sure you have the system administrator permission to add extra DLL files into system folders.
0.3 Software
In order to run our toolkit, you need to install the following softwares:
Java 8+ (Java 7 works but not recommended!)
CUDA Optional
C Library Dependency
System-orientedSee in later sectionMATLAB R2015+
If you wish to run on older system buildFor
Java 7, since it is out of its support period, Oracle has issued mandatory update and migration guide to most users. All machines which are able to installJava 7are guaranteed to support the version 8. Hilariously,Java 8has a higher performance rate thanJava 7, almost in every single way. A sample benchmark can be found here. If you still insist from updating your Java SE, please re-consider your career choice.For folks running on the edge of the world, if you are on
Java 11, since API calls are being drastically changed, please submit tickets if anything does not work for you.
If you are on older version of system, we do suggest you to update your system. As the dependency libraries either won’t compile or execute for your old system build. But we did not forget about you old school folks. There is also a MATLAB build available with the similar functionality available. Yet, the maintenance and feature update would be 2 to 4 weeks delayed since this is a one-man army work. Please have mercy on me!
If you are on edition prior to MATLAB R2015a, please make sure to comment out the spectrum related codes.
0.3.1 Windows
0.3.1.1 C/C++ Compiler Environment
The C/C++ compiler environment is needed for OpenCV feature to work properly. You do NOT need to download and install directly from OpenCV website, since large portion of the features won’t be needed unless you plan to use CUDA acceleration. OpenCVis used in the frame extraction process and parallel processing.
For folks running on Windows, please make sure to follow the following checklist to redirect to the specific links in order to obtain all the required system packages.
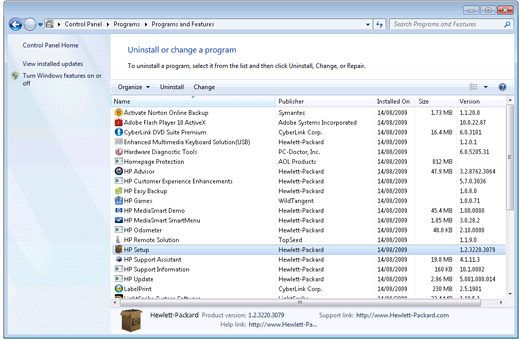
Before installing or downloading any of those, please navigate to the Programs and Features to find out which C++ Redistributable you have already installed.
For users on system prior to Windows 8 and Windows Server 2012:
Click Start
 , and then click Control Panel.
Under Programs, click Uninstall a program. The Uninstall or change a program window opens. You should be able to find all the software you installed. You may find all the installed Visual C++ Redistributable packages.
For users on system same or newer than Windows 8 and Windows Server 2012:
In Windows, search for and open Control Panel.

In Control Panel, locate Programs, then click Uninstall a program.

In the Uninstall or change a program window, you should be able to find all the software you installed. You may find all the installed Visual C++ Redistributable packages.

0.3.1.1 Server Edition Extra
As mentioned before, the Server Edition suffers from missing dependency libraries. Please make sure you follow the steps to perform troubleshooting.
может быть, это немного запоздало, но у нас была такая же проблема, и мы не нашли ответа через Интернет, так что это может помочь кому-то в будущем.
Проблема связана с отсутствующей dll в Window 2008 Server, мы решаем ее копирование этой DLL "msvcp100.dll" в нашей папке% JAVA%/jre7/bin
Надеюсь, что эта помощь
——————————— QA.RU
When you have missing msvcp100.dll, please make sure to install Visual C++ 2008 Redistributable Package.
When it comes to the missing jniopencv_core.dll, please make sure the Java installation was done properly.
0.3.1.2 Python 3
NVIDIATo install Python 3.3 or later, go to the Python home page or follow the list in previous section, and download the latest version of Python 3 for your operating system.
If you have Python 2.7 installed, you do not need to remove it.
During the installation process, if there is a check-box to add Python 3.X to your path, make sure it is checked before proceeding with the installation.

0.3.1.3 Java
Java is a dependency for OpenCV, NOAA’s Weather Toolkit and MATLAB builds.
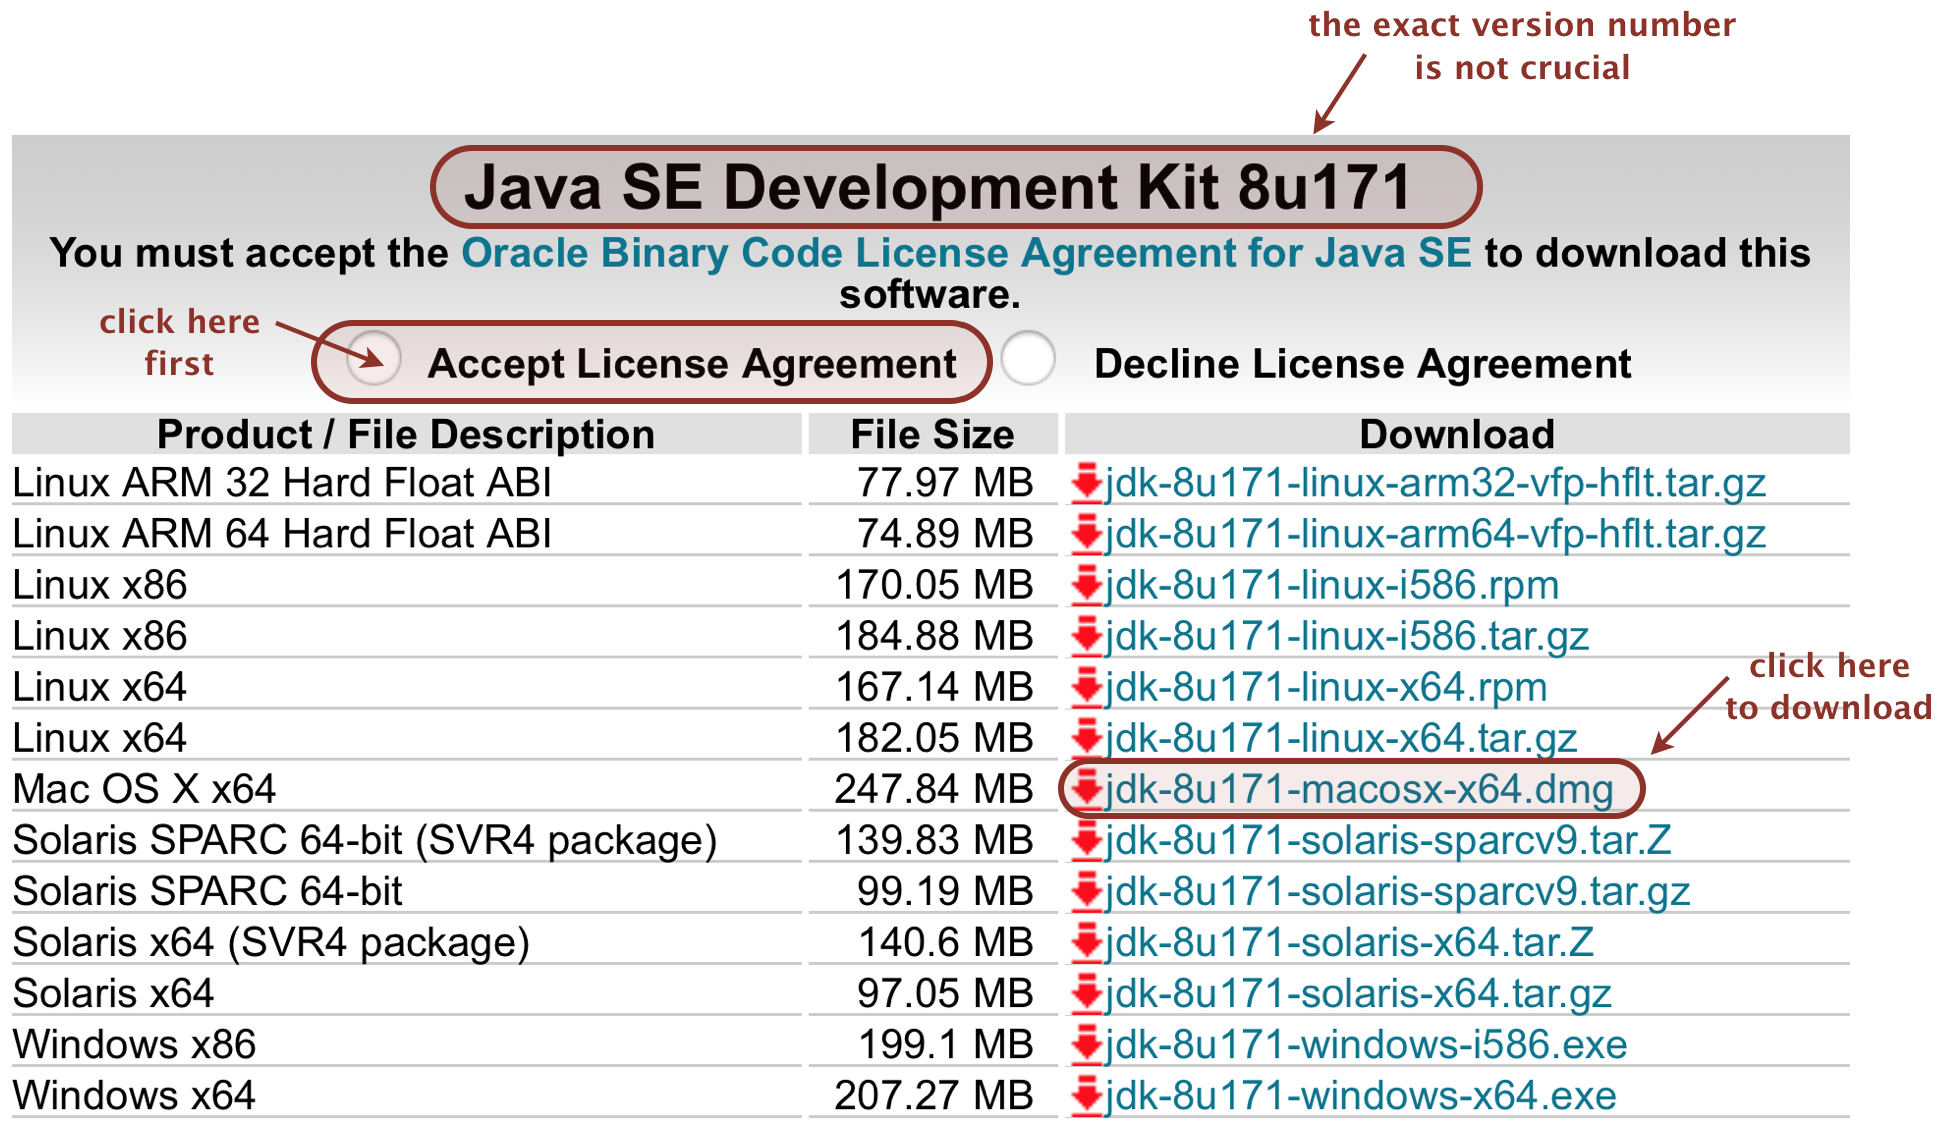
Go and obtain the desired Java SE
Under Java SE Downloads, click on
 next to the edition you desired
Click to accept the license agreement
Download the windows
.exefor your operating system (32 bit or 64 bit)Use the
.exeto install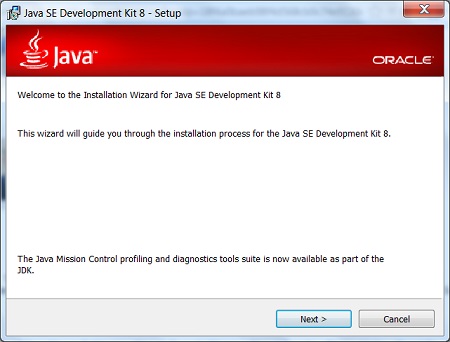
0.3.1.4 NOAA’s Weather and Climate Toolkit
You may find the latest edition via NOAA website. Also, please make sure Java is properly installed. You may find more information about it via its requirements page.
0.3.1.5 CUDA Optional
THIS IS OPTIONAL, YOU DO NOT NEED THIS IF YOU DO NOT HAVE A DEDICATED NVIDIA GRAPHIC CARD UNIT, OR YOU DO NOT NEED PARALLEL PROCESSING WORK.
IF YOU ARE ONLY INTERESTED IN THE IMAGE SUPER-RESOLUTION, DO NOT HAVE THE HARDWARE OR YOU DO NOT WANT TO GO THROUGH THE HELL OF INSTALLATION, PLEASE CHECK OUT THE OTHER REPO I HAVE FOR A PRE-COMPILED RELEASE VERSION OF IMAGE SUPER-RESOLUTION.
First, download CUDA from the NVidia website
Select the proper target platform:

Download all the installers:

Run the downloaded installers one after the other. Install the files in A:\whatever\cuda-x.x.xxx:


After completion, the installer should have created a system environment (sysenv) variable named CUDA_PATH and added %CUDA_PATH%\bin as well as%CUDA_PATH%\libnvvp to PATH. Check that it is indeed the case. If, for some reason, the CUDA env vars are missing, then:
- Define a system environment (sysenv) variable named
CUDA_PATHwith the valueA:\whatever\cuda-x.x.xxx - Add
%CUDA_PATH%\binand%CUDA_PATH%\libnvvptoPATH
When it comes to cuDNN, per NVidia's website, "cuDNN provides highly tuned implementations for standard routines such as forward and backward convolution, pooling, normalization, and activation layers," hallmarks of convolution network architectures. Download cuDNN from here. Choose the cuDNN Library for Windows that matches the CUDA version:
NVIDIA has recently removed the option for the 7.0.4 Windows download. If your system can not support the latest edition, or you are on the NVIDIA 300 to 400 series, you can download it here.

The downloaded ZIP file contains three directories (bin, include, lib). Extract and copy their content to the identically-named bin, include and lib directories in%CUDA_PATH%.
0.3.2 MacOS
0.3.2.1 C/C++ Environment
Please directly install Xcode Command Line Tools. This is released by Apple, so do make sure you have logged into an Apple ID. If you previously installed the full Xcode package, you will need to update Xcode to the newest version (Xcode 8 or newer). After updating Xcode, launch and run the Xcode application and accept the Apple license terms.
You don’t need the full Xcode package to get the Xcode Command Line Tools. You only need the full Xcode package if you are doing development of applications for the Apple operating systems. However, you may have previously installed the full Xcode package.
Check if the full Xcode package is already installed:
xxxxxxxxxxxcode-select -pIf you see:
xxxxxxxxxx/Applications/Xcode.app/Contents/Developerthe full Xcode package is already installed.
You will need to update Xcode to the newest version (Xcode 8 or newer). Go to the App Store application and check “Updates.” After updating Xcode, be sure to launch the Xcode application and accept the Apple license terms.
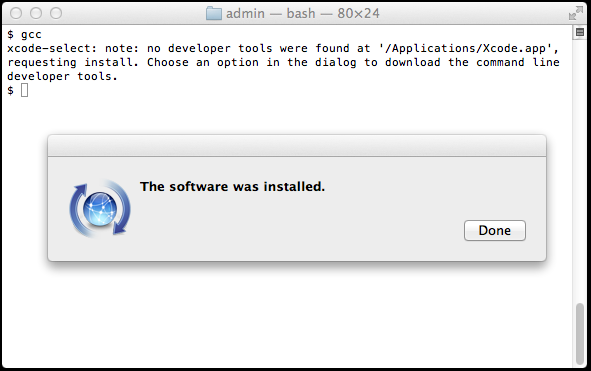
If not, you may install it by running:
xxxxxxxxxxgccYou’ll see an alert box:
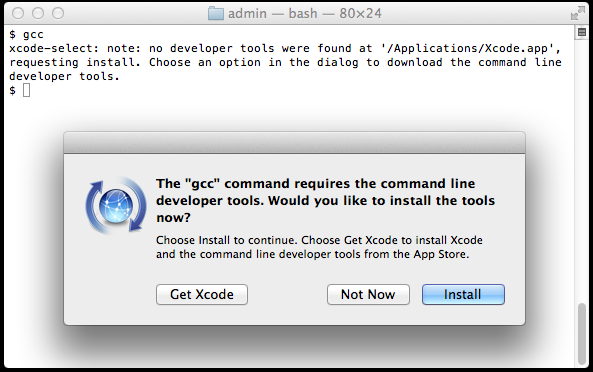
Alternatively, you can use a command to install Xcode Command Line Tools. It will produce a similar alert box. Note the double hyphen:
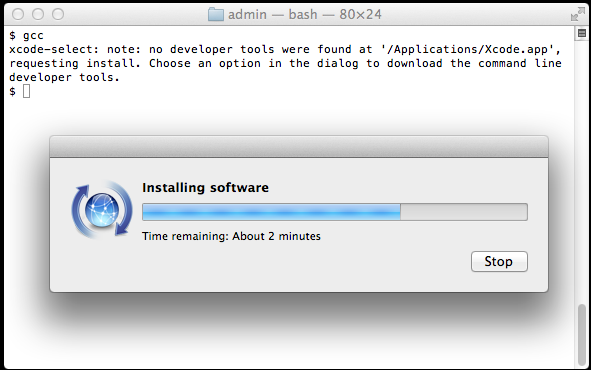
xxxxxxxxxxxcode-select --installClick “Install” to download and install Xcode Command Line Tools.
The instructions in the alert box are confusing. You don’t need to "Get Xcode" from the App Store. Just click "Install" for the Xcode Command Line Tools. If you have a slow Internet connection, it may take many minutes.
If the download takes a very long time (over an hour) or fails, you can try an alternative. Go to here and enter your Apple ID and password. You'll be asked to agree to the terms of the Apple Developer Program. You'll see a list of software packages you can download. Look for the latest version of Command Line Tools and click to download the .dmg file. Downloading the .dmg file is much faster than waiting for the command-line-based download. Install the .dmg file by clicking on the package icon.
Verify that you’ve successfully installed Xcode Command Line Tools:
xxxxxxxxxxxcode-select -p/Library/Developer/CommandLineToolsJust to be certain, verify that gcc is installed:
xxxxxxxxxxgcc --versionConfigured with: --prefix=/Library/Developer/CommandLineTools/usr --with-gxx-include-dir=/usr/include/c++/4.2.1Apple LLVM version 6.0 (clang-600.0.54) (based on LLVM 3.5svn)Target: x86_64-apple-darwin14.0.0Thread model: posixOn earlier versions of MacOS, it was more difficult to install Xcode Command Line Tools. It required a huge download of the full Xcode package from the Mac App Store or registration as an Apple developer for a smaller Command Line Tools package. Mac OS X Mavericks made installation of Xcode Command Line Tools much simpler.
0.3.2.2 Java
- Java is a dependency for OpenCV, NOAA’s Weather Toolkit and MATLAB builds.
- Go and obtain the desired Java SE
- Under Java SE Downloads, click on next to the edition you desired
- Click to accept the license agreement
- Download the mac
.dmg - Use the
.dmgto install
0.3.2.3 Python 3
The following instructions will guide you through the process of:
- Installing Python 3 using Homebrew
- Running multiple Python versions as sand-boxed environments
Open Terminal.app (~/Applications/Utilities) and type
xxxxxxxxxxpython --versionIf you execute this command in MacOS 10.12 for example, the returned output will read:
Python 2.7.10
If you execute
xxxxxxxxxxwhich pythonvia the command line, it will return the location of the program file, in this case:
/usr/bin/python
Now we should add Python 3.x via Homebrew.
Assuming you have Homebrew installed, in Terminal.app execute the following command to install Python 3 :
xxxxxxxxxxbrew install python3After installation, run the
xxxxxxxxxxpython3 --versioncommand to verify the exact version:
Python 3.6.4
Now run
xxxxxxxxxxwhich python3to determine the path where Homebrew installed the program file:
/usr/local/bin/python3
At this stage we have two different version of Python available, yet both version are invoked differently :
- to run a script with Python 2, eg.
python test.py - to run a script with Python 3, eg.
python3 test.py
0.3.2.4 NOAA’s Weather and Climate Toolkit
You may find the latest edition via NOAA website. Also, please make sure Java is properly installed. You may find more information about it via its requirements page.
0.3.2.5 CUDA Optional
- Apple has not release any official product with NVidia components for over half a decade. The best bet for you even if you have an old 650M chip is to NOT use it since it has no meaningful acceleration effect. Nor, it has enough streaming processors and shared memory for data bridge. Hence, no.
- If you are on Hackintosh, and managed to boot in with NVidia GPU. The chance is where when you install the CUDA driver, your Web driver will be replaced and your bootflag can’t be fixed. Hence, it will result in black screen as kernel panic after boot into Unibeast/Clover EFI partition loader. So, no.
- If you are using a external GPU, you may download the latest package via CUDA Zone.
Use the following procedure to successfully install the CUDA driver and the CUDA toolkit. The CUDA driver and the CUDA toolkit must be installed for CUDA to function. If you have not installed a stand-alone driver, install the driver provided with the CUDA Toolkit.
Choose which packages you wish to install. The packages are:
- CUDA Driver: This will install
/Library/Frameworks/CUDA.frameworkand the UNIX-compatibility stub`/usr/local/cuda/lib/libcuda.dylibthat refers to it. - CUDA Toolkit: The CUDA Toolkit supplements the CUDA Driver with compilers and additional libraries and header files that are installed into /Developer/NVIDIA/CUDA-10.0 by default. Symlinks are created in /usr/local/cuda/ pointing to their respective files in /Developer/NVIDIA/CUDA-10.0/. Previous installations of the toolkit will be moved to /Developer/NVIDIA/CUDA-#.# to better support side-by-side installations.
- CUDA Samples (read-only): A read-only copy of the CUDA Samples is installed in /Developer/NVIDIA/CUDA-10.0/samples. Previous installations of the samples will be moved to /Developer/NVIDIA/CUDA-#.#/samples to better support side-by-side installations.
A command-line interface is also available:
- --accept-eula: Signals that the user accepts the terms and conditions of the CUDA-10.0 EULA.
- --silent: No user-input will be required during the installation. Requires --accept-eula to be used.
- --no-window: No windows will be created during the installation. Useful for installing in environments without a display, such as via ssh. Implies --silent. Requires --accept-eula to be used.
- --install-package=
: Specifies a package to install. Can be used multiple times. Options are "cuda-toolkit", "cuda-samples", and "cuda-driver". - --log-file=
: Specify a file to log the installation to. Default is /var/log/cuda_installer.log.
Set up the required environment variables:
xxxxxxxxxxexport PATH=/Developer/NVIDIA/CUDA-10.0/bin${PATH:+:${PATH}}export DYLD_LIBRARY_PATH=/Developer/NVIDIA/CUDA-10.0/lib\ ${DYLD_LIBRARY_PATH:+:${DYLD_LIBRARY_PATH}}In order to modify, compile, and run the samples, the samples must also be installed with write permissions. A convenience installation script is provided: cuda-install-samples-10.0.sh. This script is installed with the cuda-samples-10-0 package.
To install Nsight Eclipse plugins, an installation script is provided:
xxxxxxxxxx/Developer/NVIDIA/CUDA-10.0/bin/nsight_ee_plugins_manage.sh install <eclipse-dir>Refer to Nsight Eclipse Plugins Installation Guide for more details.
Note:
To run CUDA applications in console mode on MacBook Pro with both an integrated GPU and a discrete GPU, use the following settings before dropping to console mode:
- Uncheck System Preferences > Energy Saver > Automatic Graphic Switch
- Drag the Computer sleep bar to Never in System Preferences > Energy Saver
0.3.3 Debian/Ubuntu/Linux
0.3.3.1 C/C++ Environment
In order to do so, enable main repository in Software & Updates.
Then run these commands in a terminal:
xxxxxxxxxxsudo apt-get updatesudo apt-get install build-essentialThis will install the following packages:
dpkg-dev (>= 1.13.5): Debian package development tools
g++ (>= 4:4.4.3): GNU C++ compiler
gcc (>= 4:4.4.3): GNU C compiler
libc6-dev: Embedded GNU C Library: Development Libraries and Header Files
make: An utility for Directing compilation.
0.3.3.2 Java
The default Java version in Ubuntu 18.04 is OpenJDK 10. Once next LTS version OpenJDK 11 is released, it will become the default Java version in Ubuntu 18.04.
Follow the steps below to install Java OpenJDK on an Ubuntu machine:
First, update the
aptpackage index with:xxxxxxxxxxsudo apt updateOnce the package index is updated install the default Java OpenJDK package with:
xxxxxxxxxxsudo apt install default-jdkVerify the installation, by running the following command which will print the Java version:
xxxxxxxxxxjava -versionThen you may see something as:
xxxxxxxxxxopenjdk version "10.0.1" 2018-04-17OpenJDK Runtime Environment (build 10.0.1+10-Ubuntu-3ubuntu1)OpenJDK 64-Bit Server VM (build 10.0.1+10-Ubuntu-3ubuntu1, mixed mode)
0.3.3.3 Python 3
The newer system starting from 14.04+ should ship with Python 3. If you are on old system or trying to update the newer version, please perform the following lines of commands:
xxxxxxxxxxsudo apt-get updatesudo apt-get upgradesudo apt-get dist-upgradesudo apt-get install python-dev python-setuptools python-pip python-smbusAfter all, you may update the pippackage manager to the latest nightly edition by running:
xxxxxxxxxxpython3 -m pip install --user --upgrade pip0.3.3.4 NOAA’s Weather and Climate Toolkit
You may find the latest edition via NOAA website. Also, please make sure Java is properly installed. You may find more information about it via its requirements page.
0.3.3.5 CUDA Optional
Download CUDA: I used the 16.04 version and "runfile (local)". That is 1.1 GB.
Check the md5 sum:
xxxxxxxxxxmd5sum cuda_7.5.18_linux.runOnly continue if it is correct.
Remove any other installation
xxxxxxxxxxsudo apt-get purge nvidia-cuda*- if you want to install the drivers too, then
xxxxxxxxxxsudo apt-get purge nvidia-*If you want to install the display drivers(*), logout from your GUI. Go to a terminal session (ctrl+alt+F2)
Stop lightdm:
sudo service lightdm stopCreate a file at
/etc/modprobe.d/blacklist-nouveau.confwith the following contents:blacklist nouveau options nouveau modeset=0Then do:
xxxxxxxxxxsudo update-initramfs -u
xxxxxxxxxxsudo sh cuda_7.5.18_linux.run --overrideMake sure that you say
yfor the symbolic link.Then, start
lightdmagain:xxxxxxxxxxsudo service lightdm startFollow the command-line prompts
See also: NVIDIA CUDA with Ubuntu 16.04 beta on a laptop (if you just cannot wait)
Notes: Yes, there is the possibility to install it via apt-get install cuda. I strongly suggest not to use it, as it changes the paths and makes the installation of other tools more difficult.
You might also be interested in How can I install CuDNN on Ubuntu 16.04?.
Don't install the display drivers with this script. They are old. Download the latest ones from Here.
Also, make sure to verify CUDA installation.
The following command shows the current CUDA version (last line):
xxxxxxxxxx$ nvcc --versionnvcc: NVIDIA (R) Cuda compiler driverCopyright (c) 2005-2016 NVIDIA CorporationBuilt on Sun_Sep__4_22:14:01_CDT_2016Cuda compilation tools, release 8.0, V8.0.44
The following command shows your driver version and how much GPU memory you have:
xxxxxxxxxx$ nvidia-smiFri Jan 20 12:19:04 2017+-----------------------------------------------------------------------------+| NVIDIA-SMI 367.57 Driver Version: 367.57 ||-------------------------------+----------------------+----------------------+| GPU Name Persistence-M| Bus-Id Disp.A | Volatile Uncorr. ECC || Fan Temp Perf Pwr:Usage/Cap| Memory-Usage | GPU-Util Compute M. ||===============================+======================+======================|| 0 GeForce 940MX Off | 0000:02:00.0 Off | N/A || N/A 75C P0 N/A / N/A | 1981MiB / 2002MiB | 98% Default |+-------------------------------+----------------------+----------------------++-----------------------------------------------------------------------------+| Processes: GPU Memory || GPU PID Type Process name Usage ||=============================================================================|| 0 1156 G /usr/lib/xorg/Xorg 246MiB || 0 3198 G ...m,SecurityWarningIconUpdate<SecurityWarni 222MiB || 0 6645 C python 1510MiB |+-----------------------------------------------------------------------------+
See also: Verify CuDNN installation
Help! The new driver does not work!
Don't panic. Even if you can't see anything on your computer, the following steps should get you back to the state before:
- Press shift while startup
- Go into a root shell
- Make it writable by
mount -o remount,rw /(-is?and/is-in the american layout) sh cuda_7.5.18_linux.run --uninstallsudo apt-get install nvidia-361 nvidia-common nvidia-prime nvidia-settings
1. Obtain the Toolkits
There are 3 ways to obtain the toolkits.
1.1 Direct Download
Fire up a browser, and visit this awesome page and find the Clone or download icon on the right top of the page.
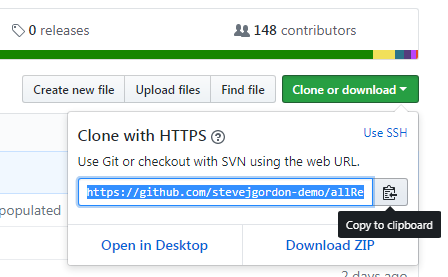
Then, click on Download ZIP to obtain all the files in the repo.
By doing so, you will download everything having been comitted to the repo, including all the testing data and RAW samples. Be prepared since right now, the repo is over 2 GB. Post download process, you may upzip the folder with your favorite utility tool.
1.2 GitHub SVN
Please visit GitHub Desktop Tool page to obtain the SVN tool. Then, go back to the this awesome page and find the the Clone or download icon on the right top of the page.
As shown in the previous image, just click on Open in Desktop, you will be able to prompt to make a clone version of the toolkits.
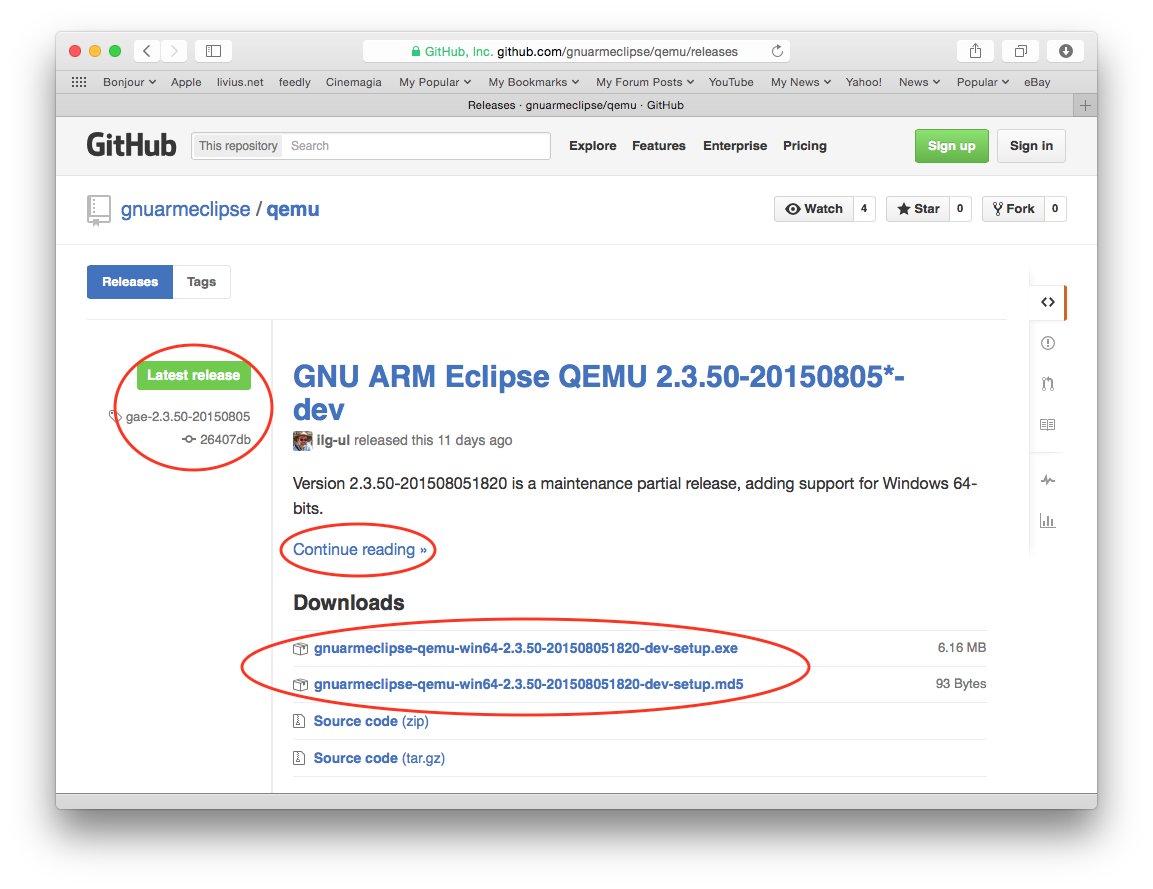
1.3 Release Edition
This will happen in the near future.
- Be sure you are in the Code view; if not, select the right side
<>code icon - Identify the releases link in the upper line:
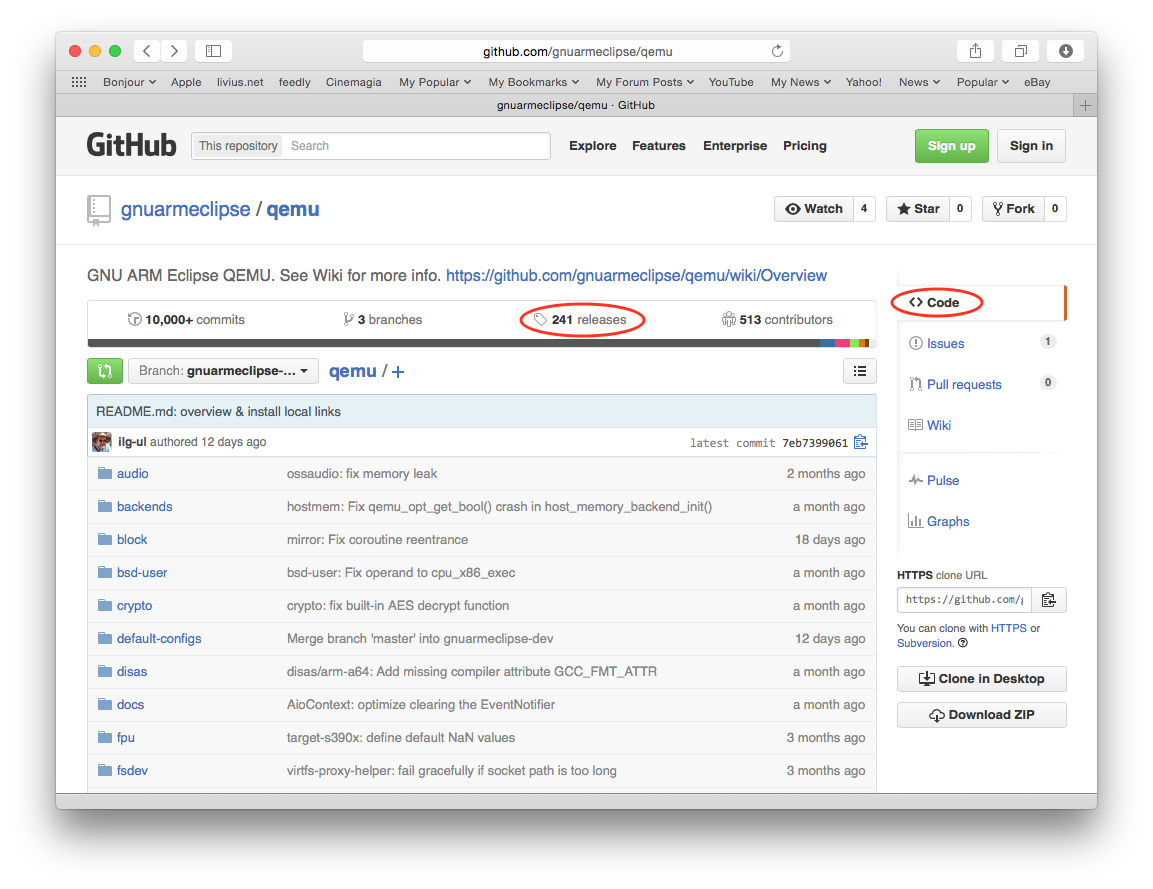
- Click the releases link; this will show the Releases view, with the Latest release at the top of the page:
2. Operate the Toolkits
2.0 MATLAB Tools
If you are on the elder edition, identify the run.m file under the archive. Then, simply click on it to trigger the MATLAB GUI. If you would like to run via command line, please run as:
xxxxxxxxxxmatlab -nojvm -nodisplay -nosplashThen, navigate to the archive to run run.m.
2.1 Python Tools
First, please make sure to have the dependency libraries properly installed. You should not worry about much. Simply run in the terminal as:
xxxxxxxxxxpython3 -m pip install -U -r requirements.txtThis would simply download all the required libraries from the official sources, compile them, and install to your local machine.
Then, depending on if you would like the GUI or non-GUI edition depending on your work environment, simply execute the run_GUI.py or run.py.
3. Misc
Should you have any questions, please let us know!